A step-by-step tutorial on canning tomatoes for beginners! Canned tomatoes are a great base for stews, soups, and sauces. Preserved by “hot packing”, summer tomatoes are blanched, peeled, stewed, and placed into jars. No pressure cooker or water bath! Learn how to can tomatoes by hot packing.
It’s summer time and you’re wondering what you are going to do with all those beautiful ripened tomatoes! Whether you picked up an abundance at a farmer’s market or they are fresh from your garden, this canning process will ensure your sauces and soups have that summer ripened tomato flavor all winter long!
Table of contents
This recipe was passed down through my grandmother, Ruth Miller, from deep in the holler of Madison County, North Carolina.
Because she grew up without many of the luxuries we have today, this canning process is truly a back-to-basics recipe – with minimal ingredients and no electric pressure cooker. In fact, many people from her generation still can tomatoes this same way. It’s my hope that I can encourage you to carry on the tradition.
Benefits of Homemade Canned Tomatoes
The great thing about this process is you know exactly what’s in your preserved tomatoes! There’s no excessive salt, seasonings, or preservatives. Just tomatoes with a dash of sugar and salt.
While the process is time-consuming, this is a simple process anyone can do. After the canning process is complete, you can add them to stews, sauces, and any other recipes that call for crushed tomatoes.
Plus, the money you will save by not rushing to the store to buy a can of tomatoes here and there!
What are the best tomatoes for canning?
The short answer is that any tomato can be canned. It just depends on the purpose. There are better tomatoes for sauces and pastes, salsas, juices, and so on. If you are getting your tomatoes from a farm or farmer’s market, you can always ask the farmer for their recommendation. They are usually very helpful and will be happy to offer tips, too!
I would recommend steering clear of beefsteak or “slicing” tomatoes as these tend to disintegrate during the canning process.
The tomatoes we used came from a local farmer’s market in North Carolina, so I’m not sure of the exact breed.
Here are a few breeds that do well as canning tomatoes:
- Bison
- Roma
- San Marzano
- Big Mama
- Jersey Giant
Waterbath Canning vs. Hot Pack Canning Methods
There are a few different methods to can tomatoes. You can use a pressure canner, hot water bath, or even in the oven. However, this tutorial provides instructions on hot packing.
Hot Packing Canning Method
Hot packing is the process of “cooking” the tomatoes down, then transferring them to the mason jars. The tomato mixture reaches boiling point and is kept there for several minutes to kill off any bacteria that may be present in the stock pot, tools used, and tomatoes. The mixture reaching the boiling point is key for food safety.
Cold packing or raw packing is a similar method. Instead of cooking the tomatoes, they are peeled and quartered and transferred to a jar. Then, boiling water is poured into the jar to cover the tomatoes.
Water Bath Canning Method
Water bath canning is the process of adding raw, uncooked tomatoes to a jar, then submerging the jars in hot water to seal. This process is also popular and equally as safe as hot packing.
Since the tomato mixture is reaching a boiling point with both methods, either option is perfectly safe.
While there are many opinions on the safety of this process, I can assure you this hot packing canning method is tried and true. My grandmother has been canning tomatoes for almost 80 years and has never had a batch go bad. I can vouch the same for each of my canning days, too.
Also, if for whatever reason your tomatoes do not seal properly, it will be obvious the moment the jar is opened!
Hot Pack Canning Tomatoes Tutorial
Yes, it’s possible to can tomatoes without a canner or pressure cooker. As a fair warning, this process is labor intensive, but so rewarding.
Supplies you will need:
- Mason jars: You can store tomatoes in various sized jars depending on your needs. These do not have to be new jars. Just be sure they are not cracked, chipped, or have any blemishes that might impact the processing.
- Lids and rings: These may or may not come with the jars at purchase. However, the lids must be brand new and never used prior to canning. The lids “pop” down as the jars seal. Once lids pop, they cannot “re-pop” on another jar.
- Ripe tomatoes: Of course, plump, juicy, bright red tomatoes are key for a successful canning day.
- Large Stock Pot
- Pot holders and bath towels: You will be moving hot jars of boiling tomato flesh around your kitchen. Make sure you have something to handle them with and a soft place to place them as they seal.
Follow the steps below for canning homegrown tomatoes. The process moves at a gentle pace to start, but speeds up significantly as the food goes into the jars.
Step 1: Sterilize Canning Jars and Work Area
I recommend doing the sterilizing prep work the day before, then the actual canning the next day.
The first step in preparing for canning is to sterilize your canning jars. Make sure you have the proper number of lids and rings for each of your jars.
Sterilize the jars and lids by running them alone through a dishwasher on a regular cycle with a heated dry, or boiling them. We chose the dishwasher option as that’s what my grandmother always does.
There’s a lot of argument out there about the cleanliness of your dishwasher and how bacteria could breed inside the sealed jar. My grandmother has always used this method without fail. Especially with the heated steam drying everything, I don’t see how any bacteria could remain.
After the jars are sterilized, allow them to cool and place them in a clean dry place until you are ready for canning. Some opt to leave them in the dishwasher until they are ready to begin.
Here are a few other things to do before beginning the canning process:
- Clear and disinfect the kitchen counters. Make sure your countertops are clear because you will need to be able to work quickly as the process speeds up.
- Set out the jars, lids, and rings for easy access.
- Clear out your sink of any dishes. You will need lots of room for the next steps.
Step 2: Prep the jars, lids, and rings
On the day of canning, line up the sterilized jars on the counter. If you have a stone countertop, place a bath towel underneath the jars to avoid accidentally shattering one while working.
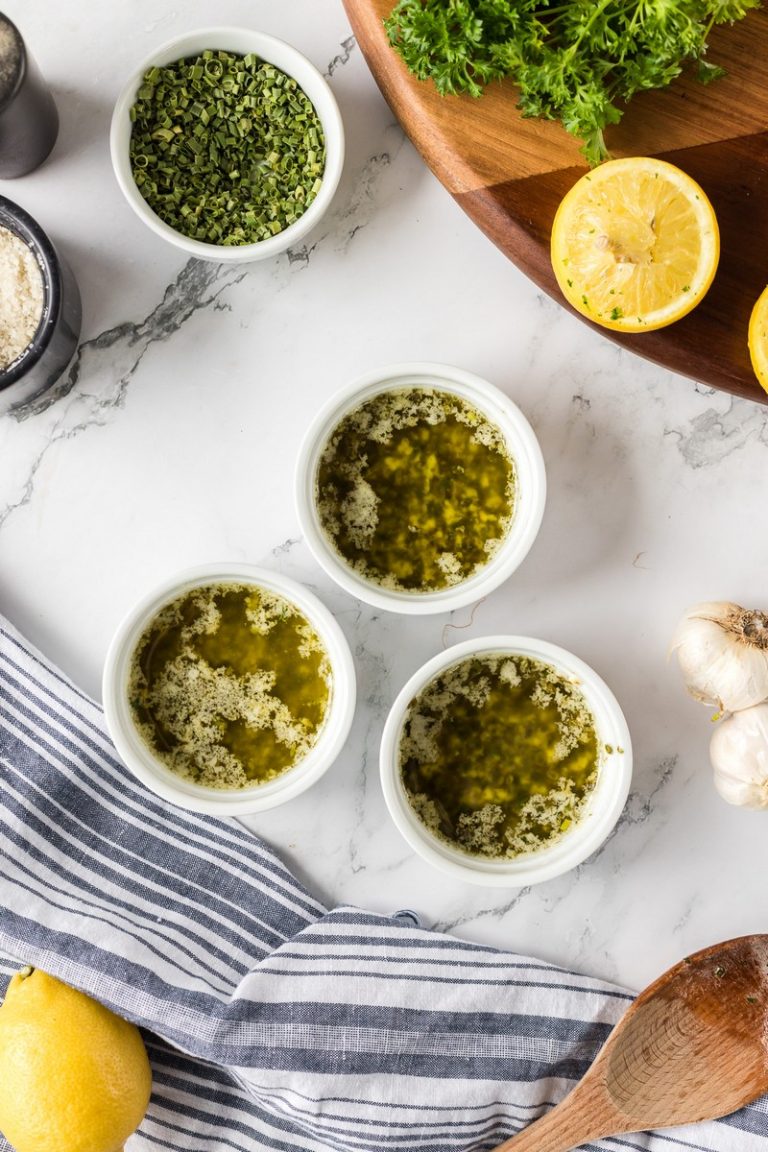
Next, add one teaspoon of sugar and one teaspoon of salt to the bottom of each jar.
Place the lids and rings in a small pot and cover with hot water – almost boiling. This is not to sterilize, but to help the lids seal properly.

Tip: Drop every other lid right side up, then right side down in the pot. This prevents them from sticking together.
Step 3: Prepare the Tomatoes for Canning
Before washing or blanching, bring a large stock pot of water to a boil. It should be enough to cover the tomatoes when they are all in the sink.
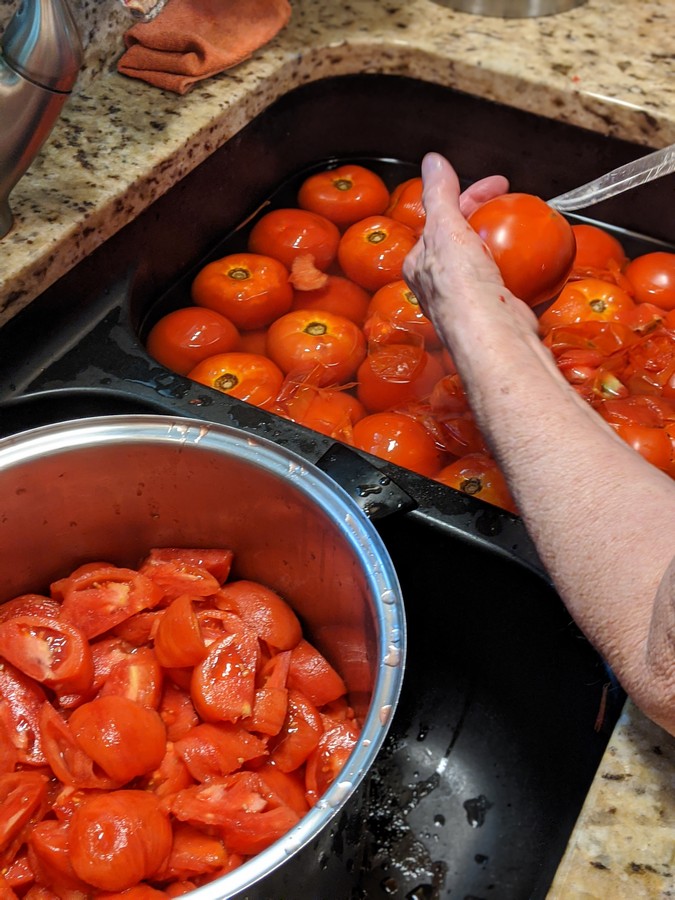
Then, wash tomatoes twice with hot water and place them in your clean sink with the stopper. Be sure to remove any dirt, and set aside any tomatoes with “bad” spots or signs of spoilage. Leave all of the cleaned tomatoes in your sink for the blanching process.
Step 4: Blanch and Peel tomatoes
Now, when your stock pot of water comes to a boil, carefully pour the boiling water onto the tomatoes in the sink. Allow them to soak for about 15 minutes to blanch.

The blanching process makes the skin peel right off of the tomato. After a few minutes of soaking the tomatoes in the sink, you will be able to see the skin start to separate from the flesh of the tomato.
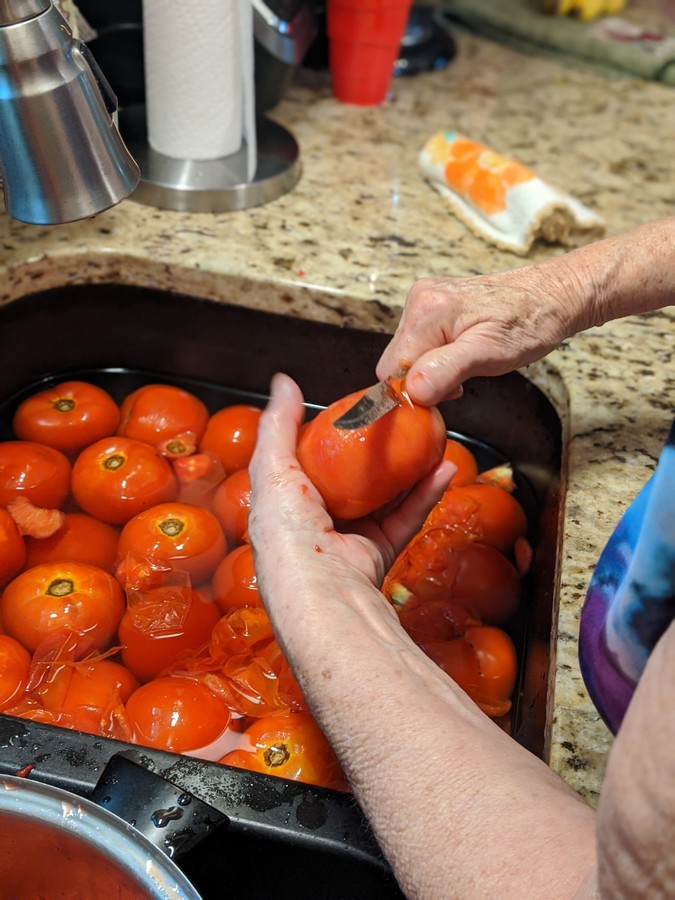
After 15 minutes, skin and core each tomato. You do not need to remove the seeds.
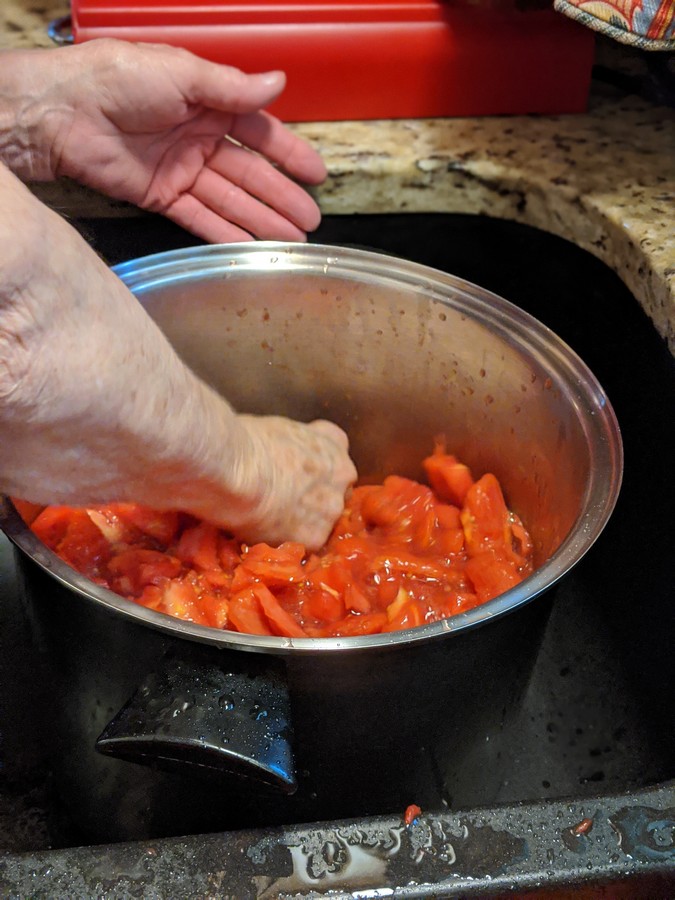
Quarter the tomatoes and place them in a large pot. When the pot is full, roughly “smash” up the tomatoes with a potato masher. This makes the cooking and canning process easier.
You will mash your tomatoes more or less, depending on the consistency you desire. If you want more of a crushed tomato, mash more. If you want more of a stewed style, mash until the tomatoes are in chunks.
Keep in mind, they will continue to break down as they cook.

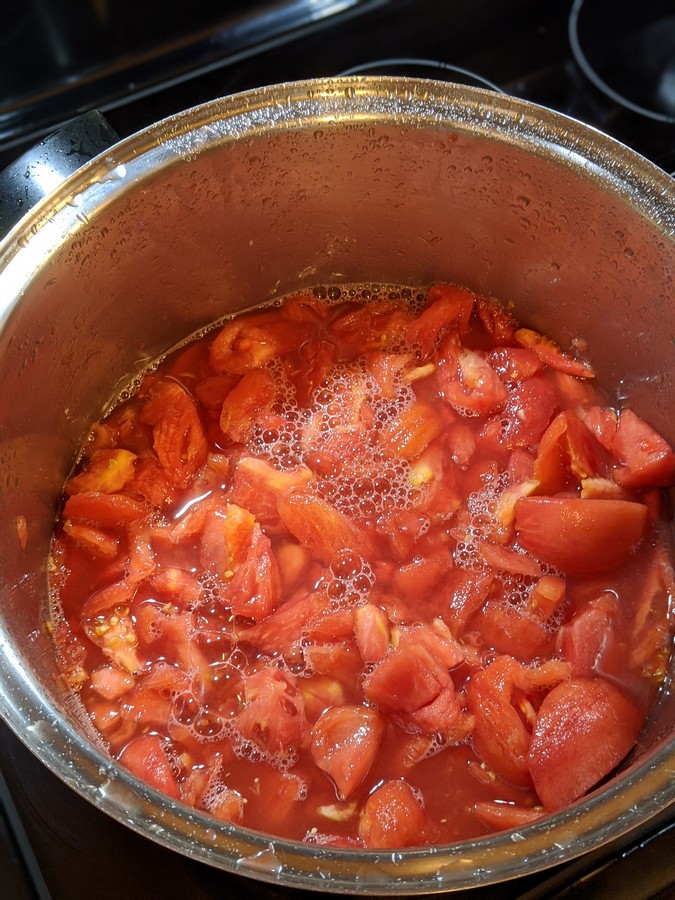
Step 5: Cook the Tomatoes
After your tomatoes have been peeled, cored, quartered, and smashed, add enough water to the stock pot to cover the smashed tomatoes. Then, bring the mixture to a boil, and boil for 5 minutes.
Again, additional cooking time will cause the tomatoes to continue to break down.
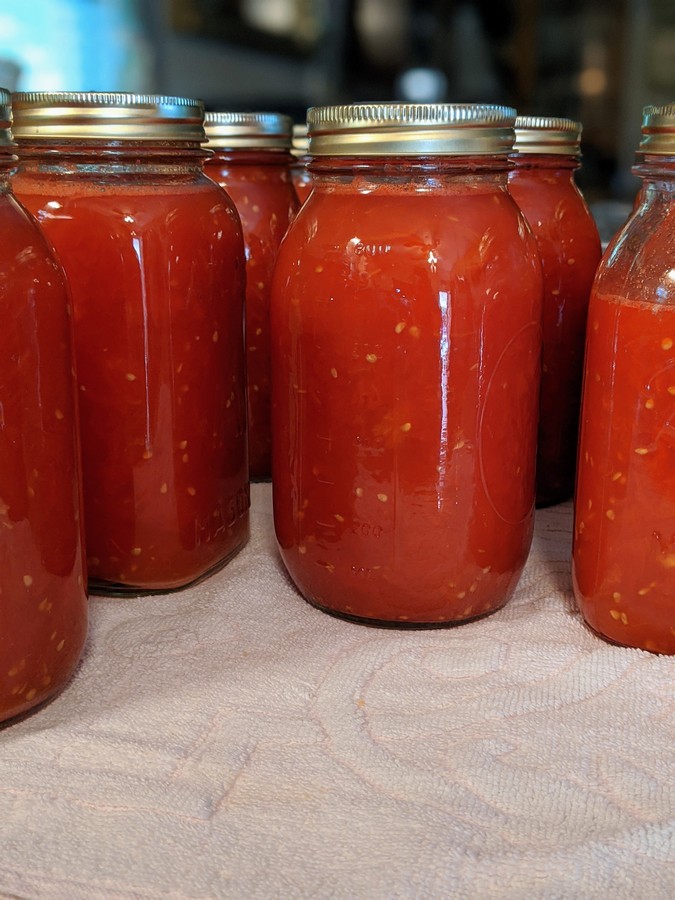
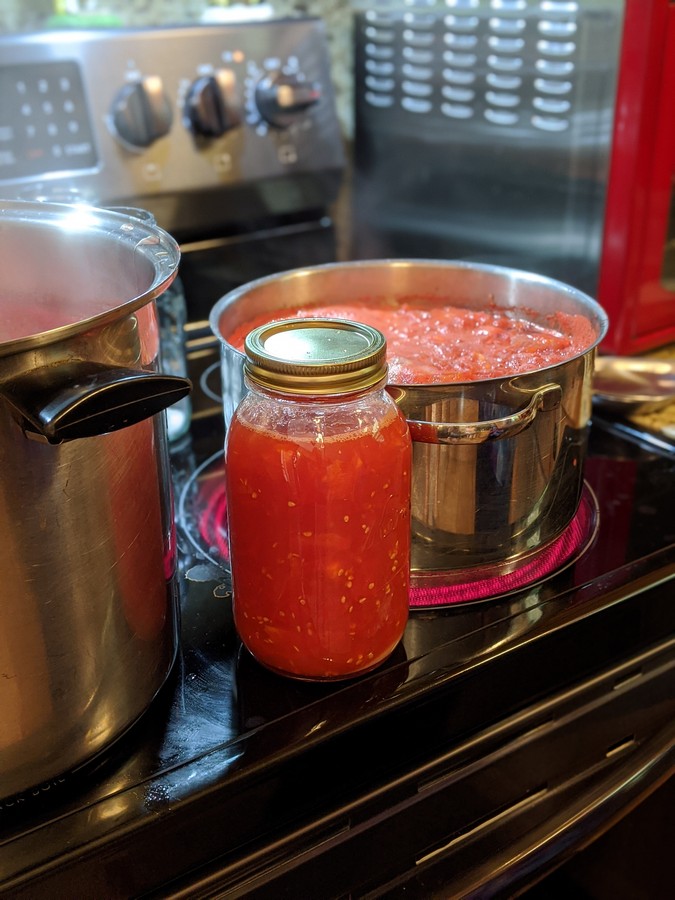
Step 6: Packing the tomatoes
This is where the process speeds up quite a bit. Do a quick double-check to make sure you have all of your tools handy. You’ll want to move fast so each one of the jars seal properly.
Working with one jar at a time, spoon tomato mixture into each jar, leaving about 1-1.5 inches of headspace.
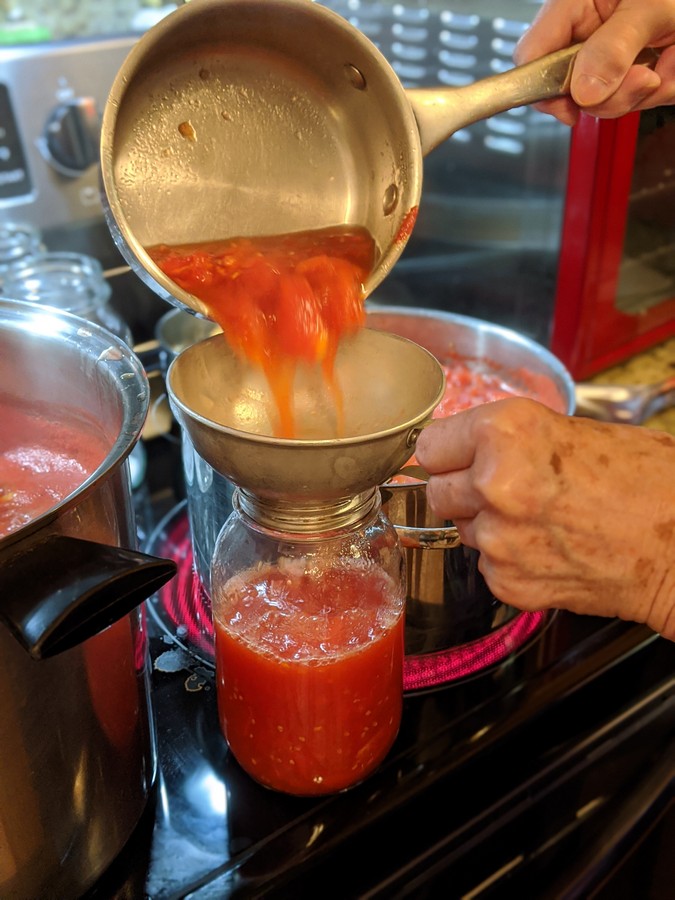
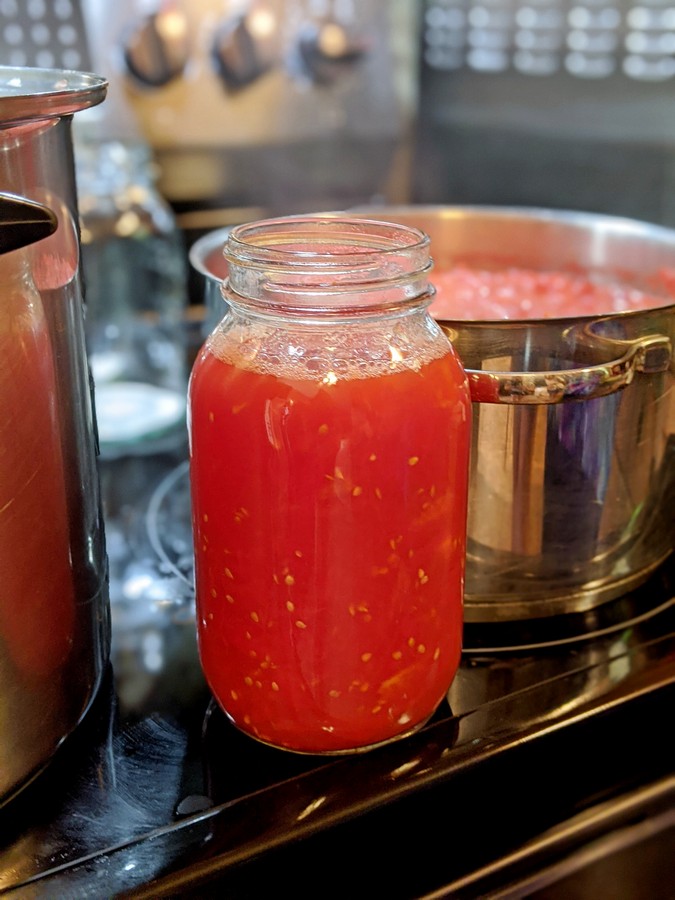
Immediately cover with a lid and ring. Seal tightly and place to the side.
Working quickly through this process allows the heat to remain inside the jar and seals the lid properly. If the lid does not seal properly, the tomatoes will not keep more than 3-5 days in the refrigerator, so this step is very important.
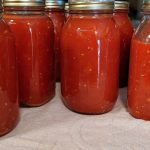
As the tomatoes “seal”, you will hear a beautiful popping noise, which means your lids are sealing properly, and you will have plenty of tomatoes for cooking. The lids will begin to “pop” or within an hour to 12 hours from placing the lids on the jars.
Ways to use canned tomatoes
We like to use our jarred tomatoes as bases and additions to soups, stews, and sauces.
Check out these recipes:
Thinking outside the box, TheKitchn has 25 creative ways to use up canned tomatoes. Sloppy joes, braising meat, cooking pastas or grains, simmering meatballs, and pizza sauce were all great ideas!
Tips for Home Canning Tomatoes
Break up this project into two days: Sterilizing and canning. On day one, sterilize jars and clear off your work space. On day two, clean the kitchen and can tomatoes.
Allow the sealed jars of tomatoes to cool before storing. I do not recommend moving the jars until the lids have sealed. Then, wait for the jars to cool completely before transferring them to storage.
Do not move or tap on the lid after the jar has been placed aside. This affects the internal pressure of the jar.
If the lids do not “pop” within 12 hours, gently press down on the center of the lid until it drops down. If the lid does not seal after 12 hours, store in the refrigerator for 3-5 days or the freezer for 3 months.
Canning Tomatoes FAQ
Do you need a pressure canner to can tomatoes?
No. Processing tomatoes via water bath or hot packing creates the same chemical reaction. The tomato mixture reaches a boiling point which kills all bacteria.
What is the difference between hot pack and cold pack canning tomatoes?
The difference between hot pack and cold pack is what happens to the tomatoes after they are blanched, cored, and peeled. Cold Pack means you will transfer them immediately to a jar and process. Hot Pack means that you will cook the tomatoes down (as described above) and then transfer them to a jar to process.
How to Can Tomatoes without a Canner
Equipment
- Mason jars pints or quarts, depending on needs
- Mason Jar Lids must be new!
- Mason Jar Rings
Materials
- salt 1 teaspoon per jar
- granulated sugar 1 teaspoon per jar
- 10 pounds tomatoes about 1/2 a bushel
Instructions
Day Before Canning:
- Sterilize jars by running them through a dishwasher or washing them with hot water and soap.
- After the jars are sterilized, allow them to cool and place them in a clean dry place until you are ready for canning. Some opt to leave them in the dishwasher until they are ready to begin.
- Gather tomatoes and other tools.
Day of Canning:
- Clear and disinfect the sink and kitchen counters. Make sure your countertops are clear because you will need to be able to work quickly as the process speeds up.
- Line up the sterilized jars on the counter. If you have a stone countertop, place a bath towel underneath the jars to avoid accidentally shattering one while working.
- Add 1 teaspoon of sugar and 1 teaspoon of salt in the bottom of each of the jars.
- Place the lids and rings in a small pot and cover with hot water – almost boiling. This is not to sterilize, but to help the lids seal properly.
Prepare the Tomatoes for Canning
- Bring a large stock pot of water to a boil. It should be enough to cover the tomatoes when they are all in the sink.
- tomatoes twice with hot water and place them in your clean sink with the stopper. Be sure to remove any dirt, and set aside any tomatoes with “bad” spots or signs of spoilage.
- When your stock pot of water comes to a boil, carefully pour the boiling water onto the tomatoes in the sink. Allow them to soak for about 15 minutes to blanch. (you will be able to see the skin start to separate from the flesh of the tomato. )
- Skin and core each tomato. You do not need to remove the seeds. Quarter the tomatoes and place them in a large pot.
- When the pot is full, roughly “smash” up the tomatoes with a potato masher.
- Then, add enough water to cover the tomatoes. Bring to a boil for 5-10 minutes.
Packing the tomatoes
- Working with one jar at a time, spoon tomato mixture into each jar, leaving about 1-1.5 inches of headspace.
- As the tomatoes “seal”, you will hear a beautiful popping noise, which means your lids are sealing properly. The lids will begin to “pop” or within an hour to 12 hours from placing the lids on the jars.
- Allow jars to cool completely before storing.


Thank you so much for this canning recipe!
I’m wondering if we’re distantly related, as my Grandmothers people were Millers from North Carolina.
I have used this method exclusively for 25 years. I boil my tomatoes though without adding water and I usually add lemon juice. When my BOILING tomatoes stop frothing, I ladle in hot jars, wipe the rim, add BOILED lid, TOGHTEN for all I am worth and flip upside down on a towel 20 minutes. When I flip them back over they sometimes seal before I set them down on the towel for 24 hours. Remove the ring & store. Never had one unseal or go bad.
I have a question.. how do you put on rings and lids just out of boiling water without burning your fingers ? Also in other canning recipe I read it says to only fingertip tighten rings until after sealed but you say you tighten firmly until sealed, why the difference? Thank you
Old time cooks have asbestos fingers. You could tighten the rings using a clean cloth or a flexible rubber jar gripper.
I did these last year and they were brilliant. I used the dishwasher and then put them in the oven to keep hot/warm until I was ready. I only did a few jars being my first time and wanting to see how long they last. From completion of the process to using the last was about 5 month. Just about to start this years batch and doing lots more this year. Maddy Williams Cardiff UK
This is so great to hear, Maddy!
Why did mine grow mold?
Hi Alice, Without knowing exactly what happened, it sounds like your lids didn’t seal correctly. Did you use new lids? Was the tomato mixture hot when you funneled into the jars? Those are some questions I would consider as you go back to the drawing board.
Are the jars supposed to be hot when you put the tomatoes in them?
As long as tomatoes are hot and tomatoes cooked like a sauce, I never had an issue with canning
Hi This was the closest recipe I found to what I remember, I know we used neither a pressure cooker or water bath, I just didn’t remember about the lids. I’m pretty sure we didn’t have a magnet so wasn’t sure about that part, I mean did we get those hot and if so, how? I think we must have just gotten the jars hot, Sound reasonable?
1st time Grandma Ruth reciepe user. How long when complete, can the canned product be stored. Thank you
This is how I was taught by my mother over 50 years ago. We didn’t have a dishwasher other than me, so we’d wash the jars, put them in boiling water to sterilize them and then keep them hot in the oven set at the lowest level until they were ready to be filled. When I first started helping, it was my job to put the sugar and salt in the jars and stir them gently. I think I was about 10 when I had that job. By the time I was 12, I was doing all the different tasks. This was how her mother and grandmother had preserved tomatoes. The only thing we didn’t do was to press down the lids if they didn’t pop down on their own. If they hadn’t popped down after a few hours, Mom would say, “Set that one aside. It will be soup tonight.” She had seen too many jars go bad over the years if they didn’t pop down on their own. I just did nearly 7 quarts of Carolina Gold tomatoes yesterday. I’m concerned that since they have lower acidity than red tomatoes that they may not keep well, but we shall see.
@Karen Oliver-Paull, use lemon juice for yellow tomatoes
Easy to follow and easy to accomoplish! I have done 25 lbs in two days!! Thanks for the help!
Easy to follow and easy to accomoplish! I have done 25 lbs in two days!! Thanks for the help!
Great recipe but in my opinion can be simplified. Instead of blanching tomatoes in boiling water, core them and place them in a bag in the freezer over night. As they thaw, the skins slip off. Also, you can sterilize your jars on a cookie tray in an oven at 225 F for 10 min. Then allow them to cool slightly on the counter before filling. I look forward to experimenting with this recipe by adding roasted garlic, a bay leaf and some fresh basil and thyme.
I’m endeavoring to can my tomatoes after 30 years of not canning them. I seem to remember investing them for a better seal. Is this a good idea?
Sorry, I meant inverting then not investing!
@Susan Pressley, I do my sauce that way. Inverted onto a towel and cover with a quilt. Old Italian Grandma method I learned on YouTube lol.
This is a lot like I have always canned tomatoes. My grandmother taught my mother and me. I cook my tomatoes until they have cooked down a little more than what yours show. I always believe “to each his own”. I don’t remember ever having a can not seal. If I have some left that is not enough to can, I put alid on it and put it in the fridge. My Dad always liked these tomatoes cooked in grease left from cooked bacon. I will do this unless I have another way to use them. I have a counter top full of tomatoes from my 8ft. raised bed outside my apartment and I am ready to get busy. Good luck with your canning! Jennifer Threet
This is how my mom taught me to can tomatoes. I haven’t canned any in a few years due to the last ones I canned sealed as usual but weeks after I canned them some of the lids were no longer sealed. I disposed of them all afraid to feed them to anyone. I messaged the guy where I got the tomatoes and he said they were a low acid variety. Do they have to be processed differently? I’m actually scared to try again. Sure do miss not having mom.
I’ve prepared my tomatoes this way, same as my mom and grandma did. I don’t add water tho. Keep Everything boiling.
If I want to add fresh garlic and fresh herbs, do I have to blanch them with the tomatoes or can they go in the jars before the tomatoes go in? I’ve never canned before and I’m quite excited to try after seeing this post. Thank you!
I’ve canned tomatoes this way for many, many years. We call it the “open kettle” canning process. I don’t add sugar, but do add salt right into the pot of tomatoes as they cook. I also use the dishwasher to wash my jars, but then also till the jars in hot simmering water just before I ladle the tomatoes into the jar then place the lid and ring onto the jar right a at. I do 1/2 bushel of tomatoes with just salt added, and do another 1/2 bushel with added chopped celery, onion and green pepper and salt to taste. The require a longer cooking time so the added chopped vegetables cook until they are well cooked. We eat them by the bowl with crackers!
@Carol Elder, do you not our citric acid or vinegar or lemon juice in jars before canning? How long will juice last in jars?
What is the shelf life using this method? Thanks.
I love this! Been looking for a good way to get it done ???? THANK YOU
This is the method I used for years when I was younger. Was looking for my canning book, unfortunately couldn’t find it. Then I found your site and the amount of time to cook is what I couldn’t remember in my elder years. Lol Thank you so much for this information!!!!
Did it this way for 60years, apple sauce too.
I chop up green peppers, onion’s and celery in my food processor,and add to my tomatoes when cooking them. Delicious! And ready to add to chili goulash, spaghetti or whatever I’m making.
I’ve canned tomatoes like this for YEARS.Z It is the best
The same way my mom did it for years
I am so glad I found this information. I have never canned tomatoes before and since we have an overabundance of tomatoes this year I have been swamped with tomatoes so I started canning them. However I used the water bath technique which is extremely long. Since none of my cousins or I ever really helped our grandmother with canning we were all pretty uninformed on how to do this. I asked them can’t we find a more simpler way to can? Of course none of us had the answer.???? I told them granny never used a pressure cooker and we survived. Definitely gonna start doing it via this method. Worst thing that can happen is they spoil ????????????. Which if I do it correctly shouldn’t happen. Thank you so much for this information.
@Cynthia Fagan, I water bath mine – I get 100% seals that way. Not sure why the title even mentioned pressure cooker
This will be my first time canning anything. Will these tomatoes be shelf stable or should they be refrigerated after canning?
As long as the lids seal, they are shelf stable and do not need to be refrigerated.
@Michael Kelley, I have best luck with seals with a water bath.
@Anna Kate,
@Gary,
How do you know if the kids are sealed?
@Gary, you’ll hear a popping noise and there will be dimple or indentation in the center of the lid.
Hi, I absolutely loved this recipe! I am washing the jars in the dishwasher as I type this so I can can tomorrow morning before it gets hot. I have one question, could I put a basil leaf in each jar also? If I don’t have fresh basil leaf could I use dried? Thanks, BTW I am a first time sauce canner but a long time jelly maker from Connecticut.
@Michelle Sleeper, why absofrigginglutely, Michelle, … you can add almost anything utilizing this method, but as the lady said, the kitchen will be/get very hot, … my grand mom used this method, and she had a huge old kitchen cast iron coal stove, … (they had electric, but used it only for the lights, (before the 1960’s, they used coal oil lanterns, in the evening, and heated the house with the coal stove I mentioned, and some really cozy homemade quilts, & throws), … the state finally blacktopped the gravel road they lived on, in 1967, … but Gram, would put garlic, dill, oregano, and other spices, into whatever she had sliced chopped, minced, or whole clove of garlic, into several of the types of canning she did, … she made her own homemade cream corn, beets, tomatoes, regular, corn, and other things when/if she had enough material, for whatever she was putting up for winter, … she only added just about a 1/2 teaspoon of sugar to a lot of the things she canned, … I swear that the woman was a genius, because of all, of the things they made/used/ designed, and invented, … she took a tobacco stick to a yearling bull, that had stepped on her foot, while she was trying to milk his mama, … and had came flying out from behind the barn, in full sprint mode, as the youngling tried to escape her wrath, with that hardwood tobacco stick, … she was 60 years old, … and it was 1971, cause my stepdad was driving my mom’s new 1971 LTD wagon, … I was 17, … as I was unhooking, then rehooking, the wire over the post that kept the cattle out of her garden area, on the second such post, … she milked her 11 cows, in the morning, then slopped the hogs, started the coffee, after raking the stove of clinkers, then set about making breakfast as she returned from getting the eggs from the chicken house, … and after washing up the dishes, she would start making the dinner time meal, which would usually take a couple of hours, no matter what she was going to cook, … then she would make time, to make 2 different types of dessert, and generally it was/would be something like blackberry cobbler, or peach cobble, or apple cobbler, she always had something going on in the kitchen, … we also helped her churn the butter when ever family came down to see her, … she even made some snapping turtle soup, with the chunks of turtle meat in it, and I thought it tasted great, … but then my 3 favorite spices are salt, pepper, & garlic, … Lmbo, … usually when it got dark, we’d have to come inside, and settle down, get quiet, &’ready for bed, … but this darn old memory lane thing got me to rambling on about life when I was growing up, … so I apologize for making this so long, but experimentation of adding things to other things that one is preparing to put away, for another time, will let you know just how far you can/should go, so if a sprinkle of garlic powder is what you would generally use, then use the same amount for the other, … but dried spices will be 1/2 as effective as fresh, … just something yo keep in mind, … John, …
@John Osman, I really enjoyed hearing about your grandma. I never had the pleasure of having a granny and I felt cheated. Everyone should have a granny.
Thank you for such a detailed explanation & for posting it! I’ve watched many videos, some from other countries where they can several foods using this method. Thanks again
Hi, would it be easier/OK to core the tomato before the blanching process?
Im new to canning and ive got a mixed bunch of tomatoes from the garden i would like to preserve
Hi Arianne,
After blanching, the tomato is much easier to peel and work with because the hot water softens the tomato – almost “cooking” the outside. I’m not sure you should core the tomato and then blanch with boiling water as the tomato might become mushy and fall apart with the core missing. If you do try it this way, be sure and let me know how it works so I can add those details to the recipe.
Hope this helps! Thank you for stopping by!
– Anna Kate, Southern Cravings
Yep, this is just how my Mamaw in Jellico, Tennessee canned her tomatoes! She did cut an “X” into the bottom of the tomato before dropping them into the hot water, and she only blanched them for 5 minutes, the skins peel up from the X cut almost as soon as you put them in the cold water. Thanks for posting this, we’ve never, ever, ever, given our tomatoes a hot water bath, not once in many decades of canning tomatoes. Some varieties of tomatoes are considered “low acid” variety and if you’re canning those, a little citric acid (or lemon juice) in the bottom of your jars and you’re good to go. I don’t understand the negative comments when this recipe has been tried and true for decades.
Happy Canning Y’all
@Terri, thank you for reminding me to cut an X in the bottom of the tomatoes before blanching them! My mother-in law always did that too!
Thank you for posting this, I have been trying to find a recipe that does not require adding any other veggies. The only change is did was running my tomatoes through a tomato press then added the directly to the jars. Now I will be putting them into my homemade mac and cheese which is the bomb!!!
Thank you so much for sharing this recipe! My Grandma used to do this same process and I never wrote it down, but after reading your recipe it all came back to me!!! Thanks! 🙂 I will for sure pass this down to my kids.
PS.. From North Carolina
I’ve found an easier way to slip tomato skins involving no boiling water. I half and core fresh tomatoes and lay them out on a cookie sheet (one with sides to catch any juice). Then I broil them in my oven for about 3 to 5 minutes. Take them out and the skins slip right off. I wish I could have told my Mom about this years ago so she wouldn’t have had so much steamy work in a hot kitchen when she canned tons of tomatoes.
@Linda Zee, that’s the absolute best way!! Then I pop mine in a colander to stain off excess liquid. Great process
Can I add onions with the tomatoes to this canning process?
Hi Kathy,
I would not recommend adding onions as I have not tested that with this recipe. If you choose to do this, I would recommend proceeding with a pressure canner. Thanks!
@Anna Kate, my mom canned tomatoes with onion and green peppers added to them. As long as everything is brought to a boil and cooked thoroughly, you should be good to go. We never got sick from this. My wife and I don’t do this as we add onion and peppers fresh when making chili and spaghetti with the canned tomatoes
@Vince, my gggma right down to myself do this. I learned that you have to cook them and spoon the foam off until you don’t get much if any foam at all forming. Time consuming yes. But have only lost 1 jar in year and years of canning. I also either boil my jars and can while hot or after bleaching the dishwasher we rinse the jars and run the sanitize cycle. Still using them while hot. Happy Canni g everyone!
What size jars? I only ask because of having to add Salt and Sugar to each jar.
Hi Randle, I use 32 ounce jars. Thanks!
Safety first is what they always say, right? For goodness sake this “kettle canning process” only leaves out the water bath step that kills the bacteria. The altitude where I live only adds 30 minutes to this processing method. Is everyone in such a hurry to opt for being unsafe? Truly life is worth just a little bit more safety.
By the way as a senior guy, I plant, grow, harvest, can ( canned 300 jars 2020, and working on 200 for the 2021season, not done growing yet) cook and eat a lot of vegetables. Also, jelly jam and preserves. Enjoy the fruit of your labor, do it right the first time.
TIP: I almost don’t want to tell you this, but go to Goodwill just as they open the doors in the morning. Head to the clear glass bottle section (take a cart). There are almost always canning jars, some with rings). If any jar is not priced. The cost is fifty cents. Always check the rim for chips because any chip will not allow the seal to take place. I bought 36 wide mouth jars (no rings) for $18. Hey, you need to wash them just like you do new ones.
@Jim, our goodwolill charges $1.99 a jar
@Jim, there are so many things our grandmas and moms did that today are considered unsafe. Who knows why they get so crazy about stuff, but I do know many who have been doing this for years. Can they all be wrong? Remember when they told us not to jump in the lake after eating? I think today we are overly cautious about too many things. Maybe it’s just CYA.
This may be a stupid question but do you sit the jars upright or upside down?
@Gina,
I’ve looked at all of the comments, both negative and positive…. I’m happy for all the successful outcomes. I can’t argue that it’s worked great for them. Even better are the memories. I myself, will follow the directions and go ahead and hot water bath my product. I’m at 6500 ft so I feel more comfortable with that. Thank you for your post.????
@Debbie, same. It really isn’t that much time off you think about it.
I have been storing tomatoes for over 25 years.I found a cheaper way to store my tomatoes. After i blanch my tomatoes i cool them and store them sealed freezer bages. They last up to 2 years in the freezer. Bags only cost 2 dollars for 10 bags. I already have 16 quart size bags fozen already. I use them in spaghetti, lasagnas, chili and soups and they tast great. I usually used them up within a year because i cook a lot. I grow my own tomatoes . I have 26 plants up to 5 ft tall each.
Wow! I wish I had the space to grow that many tomatoes. Freezing is a great alternative to canning. We use them in all the same ways, too!
Thank you so much for reading and stopping by!
@Rickie Daniels, so you blanch them whole and then cut into what size pieces before freezing? Have to lay them flat in the freezer?
@Connie Walters, I just quarter mine after peeling and coring. I boil my jars to sterilize x 20 minutes and the lids and rings too. I also use a pot of water to dunk several of the tomatos at a time before peeling instead of using the sink.
@Anna Kate, you can buy a box of canners from the farmers market and a lot will take orders.
@Rickie Daniels, I do that sometimes too but I prefer to can them if I have time to do it. I think they taste better, look beautiful on my shelf, and just remind me of Mom. ????
@Connie Walters, I don’t blanch and Peel before freezing. Wash well, core and put whole in freezer bag. When go to use don’t thaw, run under cold water and skin comes right off. Will need to thaw after peeled if need to cut up for recipe you are using.
This is such an easy way to can tomatoes. No big production. Easy beasy. Thank you for sharing.
You are welcome! Thank you for stopping by!
I have done this for 45 years. People think it is not safe, wrong.
I have canned tomatoes by tthis open kettle method, also in a boiling water bath and a pressure canner. I always add a little citric acid and often a basil leaf. I feel that the tomatoes taste better and even look better in the jar using the open kettle method. I am 75 and have never gotten sick from eating my tomatoes. When I was a young wife three neighbor ladies took me under their wings and taught me to can. Two of them and I often combined our veggies and canned together splitting the jars by 3 at the end of our session. The extra odds and ends left over at the end of the day we cooked and made supper together.
What a wonderful memory, Mary Ellen! There are a lot of memories created when we can learn from others. Thank you for visiting my site!
Don’t you use tsp of salt and sugar?
Hi Debra,
Yes, I use a teaspoon of salt and a teaspoon of sugar in each jar. I just updated the post with additional instructions as there was a glitch on my site.
@Anna Kate, What kind of salt kosher or or pickling or regular table salt
Hi Dana, I used table salt!
Just canned a small batch today using your process. And much like the other comments, this is how I remember my grandma and mom doing it as well. It may not get me a blue ribbon but my family sure ain’t complaining! Thank you for publishing!
I have been doing this recipe for over 30 years and it is a safe process as long as tops pop.
Do you have to add the lemon juice or citric acid to each jar also? I’ve read a couple different ways to can tomatoes and did not see anything about that in your directions? Thank you!!
Hi Markie,
No I do not put lemon juice in the jars. Just salt and sugar.
@Markie M, if your worried about the acid level you can add a teaspoon of lemon juice to each jar.
How long will they last canned like this? Just did a small batch.
Hi Douglas! In my experience, they last several years, just as any other canned vegetable.
I hope you enjoy them!
I as well have been canning tomatoes this way for years. I do cook my tomatoes longer with constantly stirring until tomatoes are cooked down real well and I’m also remove as much foam as possible.y grandma and mom taught me to do it this way and have won ribbons on my tomatoes. They are delicious!
This is called open kettle canning and it is no longer considered a safe way to can. You are not getting all bacteria sterilized out during this process, and today’s tomatoes do not have the acid content of the tomatoes your grandma used to can with, which reduced the risk of spoilage. With some bacteria, the food may look okay and still make you sick. In our state, you would not win a purple ribbon, and would actually be disqualified if you entered a jar canned this way in a county or the state fair. Check with your local State Extension Office or the Ball Blue Book for current safe canning regulations. Better safe than sick!
Hi Lorrie,
I wasn’t aware they were testing tomato acidity. That must be a new fangled thing in your state!
The truth is, there’s bacteria in every single food item we consume, so you will never be “free” of bacteria. However, I can assure you this recipe has never resulted in a single spoiled tomato or sick person.
In fact, it’s the exact same chemical reaction as with the use of an electric canner. And, even with all the hooting, hollering, and hate mail I’ve received regarding this recipe, not one person has been able to provide concrete evidence that this is a “dangerous” or “irresponsible” way of preserving foods.
Thank you for the heads up on your state fairs. I (and Brenda) will make a special effort to steer clear of any blue ribbon contests in your neck of the woods.
Have a nice day!
Brenda – I’m sure your tomatoes are delicious!
@Anna Kate,
@Lorrie Root, Many people have done this for decades just fine. The rules keep changing. Not sure why so many negative comments. IF you don’t like it, move on. Why try to get people to change something they have done successfully for hundreds of years?
@Lorrie Root, This is what I read: “The reason open kettle canning is no longer recommended is that the food may not be heated adequately to destroy the spoilage organisms, molds and yeasts that can enter the jar while you are filling the jar, and it often not produce a strong seal. So basically, this means, user error. They have to change the rules for people who skip steps. But for all of those who know what they are doing, this is still a great way to can. Many rules are changed because of user error.
Do you have to boil the jars once they are filled and sealed?
No you do not as the same chemical reaction will take place inside the jar as with boiling. As long as the lids pop down and seal, you are good to go!
how do you store them. pantry? freezer?
Store them in the pantry
Sanitizing in newer dishwasher is not recommend. The new units do not get as hot and use rinseaid to chemically dry your dishes. This is something that
manufacturer had to do to meet energy standards. I would recommend boiling the jars as you will be doing their with the lids anyways. Btw I have ten years experience working on dishwashers.
Hi David, Those are excellent points which I did not know about. Thank you so much for your insight. I will make a note to include this information in the post.
Thank you again!
Thanks ????
My mother & grandma Barley taught me how to can tomatoes like this years ago in the early 70’s .We used our can tomatoes in soups & stews in the winter . Also used them in Goulash, chili, Spaghetti sauce & gravy . So very good & never had any tomatoes to spoil .
This is NOT a safe recipe and should not be published.
This recipe has been used for many years, and my family has been canning tomatoes this way for decades. I assure you it’s 100% safe as it’s the same chemical reaction just without electricity.
Ben canning them this way for years, was taught by my grandmother to do it this way for diced or juice. Never had any go bad and it’s always gone by next year.
My mother & grandma always canned their tomatoes like this & in the 70’s they taught me to can tomatoes . I am 69 years old & never anyone in my family ever been sick from eating tomatoes canned this way .Soooo I would say 100% safe .
This IS a safe way I’ve been using this method for many years and have NEVER had any problems with my tomatoes going bad also they can last for couple years.
Joe; I have used this method since the mid 70’s and never had anyone get sick BUT I add a few more steps in my process. The quart jars are thoroughly washed and then placed wet upside down in the over at 265 degrees. They sit in the oven for at least an hour. I also boil the lids and tops for about a half hour. I also boil my tomatoes for probably two hours before they are canned. Then the assembly line begins. Hot jars from oven, add a teaspoon of salt, fill within 1″ of top with hot tomatoes, place hot lid, place hot top and invert on wooden cutting board. Cover then all with a few towels and let them sit 24 hours. I probably have canned more than 200 quarts over the years and never had a bad one.
Seems to me the author is still alive. Grandma’s who did this are. Those still doing this are.
This is exactly how I was taught. It’s what I know, so it doesn’t seem hard at all. I’ve never had a bad batch. I used pressure cooker method for a bit, but reverted back.
I’m so glad! I love this recipe and can’t wait to do it again this season.
How long do the canned tomatoes last on the shelf?
Looking for jar lids. Help
@Brenda Boatright, google Kerr canning lids — I bought large and small lids at a great price just last week.
Another thing, I shortcut tomato sauce creation by running la roma or juliet sauce tomatoes thru the Cuisinart shredder WITHOUT PEELING (to me that is where the good stuff is), place the mix in a crock pot on high for 4 to 6 hours and use a electric mixing stick every 1-2 hours. You will find that the sauce created is smooth and no seeds or peels present. Then cool overnight in frig and the next day place 2 cups of sauce in a 1 qt zip lock bag, seal while flattening, place a piece of wax paper between bags and put in freezer. To use then thaw and add garlic, basil, etc. To thicken add shredded cheese. Makes great spaghetti sauce or tomato soup. ALSO NO CANNING!!!!
How long does it take for the lids to pop?
Hi Marlene,
Great question! The lids can take anywhere from 1 hour to 12 hours to begin sealing down. If the lids do not “pop” within 12 hours, gently press down on the center of the lid until it drops down.
I hope this helps. Feel free to email me if you have anymore questions! [email protected]
This is how my mother did it and I do it exactly the same way.its a process but they taste awesome. Thank you for sharing.
@Kim Petrie That is why i freeze mine
Looking for jar lids. Local grocery stores can’t get any. Help
Hi, I founds dozens of regular and wide mouth jar lids at my local Walmart. I hope that helps.